A First Lesson in Docker Containers and Images
02 Mar 2023
Well stated by Julia Evans:
The word “container” doesn’t mean anything super precise. Basically there are a few new Linux kernel features (“namespaces” and “cgroups”) that let you isolate processes from each other. When you use those features, you call it “container”.
Docker is a fully-featured container environment that automates the creation of containers, and allows the monitoring and management of multiple containers, even across multiple hosts. The Linux container technologies have a much longer history than Docker, but Docker makes everything easier.
Table of Contents
- Docker Architecture
- Launch Our Own Docker Containers
- Configure Networked Containers with Docker Compose
- Footnotes
Docker Architecture
According to DKR1:
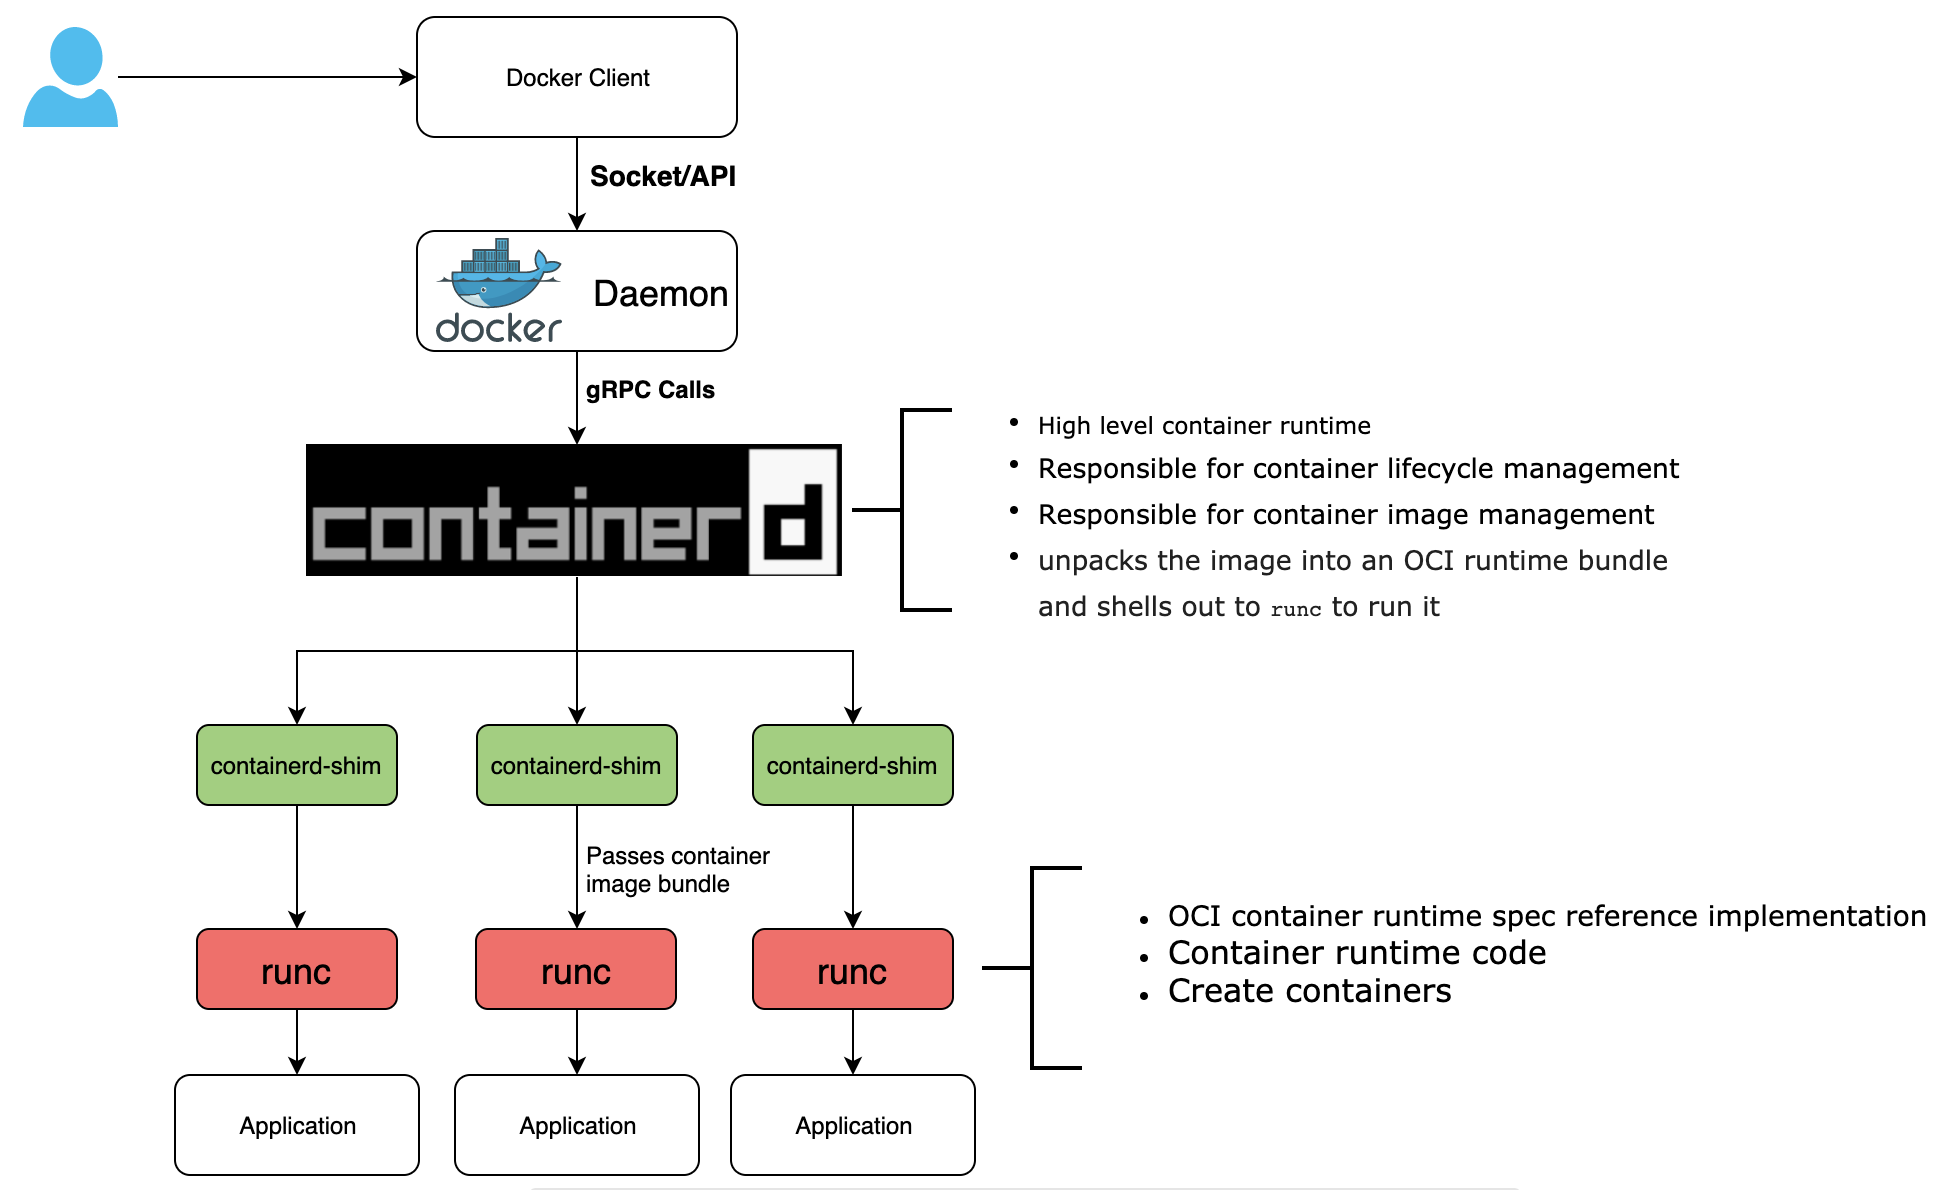
It’s easiest to think of Docker as consisting of two parts: the client and the server/daemon. Optionally there is a third component called the registry, which stores Docker images and their metadata. The server does the ongoing work of building, running, and managing your containers, and you use the client to tell the server what to do. . . . Clients drive all of the communication, but Docker servers can talk directly to image registries when told to do so by the client. . . . Each Docker host will normally have one Docker server running that can manage any number of containers.
Back in the old days, Docker was a huge, “monolithic” program with a single application translating commands, pulling in the container image2, starting the image, and making it accessible on port 80. Now, after a lot of changes, we have the Docker CLI client docker that accepts commands and tells the Docker server with a daemon process what to do3. A single client can actually address any number of servers.
Source: Avijit Sarkar's blog post
The Docker daemon, “dockerd,” always runs in the background and listens for Docker Engine API requests via three different types socket: unix, tcp, and fd. Rather than being entirely monolithic, the dockerd server orchestrates a few other components behind the scenes on behalf of the client, including containerd-shim-runc-v2.
Next, a container runtime is responsible for pulling in the container image. Docker has used the container daemon, “containerd,” as part of Docker Engine for managing the container lifecycle (creating, starting, and stopping) since version 1.11. As a high-level container runtime, containerd runs on its own, abstracting system calls and operating system-specific functionality, with runc as its low-level container runtime.
All of these, Docker CLI, dockerd, containerd, runc, are entirely separate programs.
Launch Our Own Docker Containers
In this section, I would like to provide a simple example of how to launch a Docker container from a Docker image.
Installation and Configuration
The Docker client and server are bundled together in the APT package docker.io. To begin with, let’s install it on our Linux machine:
sudo apt-get update

sudo apt-get install docker.io
The Docker server, as installed, should run automatically when our system boots. To make sure of this, we can manually add it as a startup service to systemd:
sudo systemctl enable docker

sudo systemctl start docker
To verify that Docker was installed correctly, and that the server is currently running, do:
$ sudo docker version
Client:
 Version:           20.10.5+dfsg1
 API version:       1.41
 Go version:        go1.15.15
 Git commit:        55c4c88
 Built:             Mon May 30 18:34:49 2022
 OS/Arch:           linux/arm
 Context:           default
 Experimental:      true

Server:
 Engine:
  Version:          20.10.5+dfsg1
  API version:      1.41 (minimum version 1.12)
  Go version:       go1.15.15
  Git commit:       363e9a8
  Built:            Mon May 30 18:34:49 2022
  OS/Arch:          linux/arm
  Experimental:     false
 containerd:
  Version:          1.4.13~ds1
  GitCommit:        1.4.13~ds1-1~deb11u3
 runc:
  Version:          1.0.0~rc93+ds1
  GitCommit:        1.0.0~rc93+ds1-5+deb11u2
 docker-init:
  Version:          0.19.0
  GitCommit:

$ ps aux | grep docker
root       590  0.3  7.3  941680    69112  ?        Ssl 12:30  0:39  /usr/sbin/dockerd -H fd:// --containerd=/run/containerd/containerd.sock
pi        3903  0.0  0.0    7452      596  pts/0    S+  16:02  0:00  grep --color=auto docker
By default, non-root users are restricted from access to the Docker server. Docker establishes a group, aptly named docker, to which its members are conferred additional privileges for launching and managing Docker containers. Add our user to this group with the following command:
sudo usermod -a -G docker $USERNAME
Verify that the user has been added to the group by issuing the following command:
getent group docker
Alpine Linux Image Creation
Alpine Linux is a minimal Linux distribution that uses the lightweight musl c library instead of glibc, and has a minimal set of shell utilities and mounted files and directories to enable interaction via the host Linux kernel. Alpine Linux is available as an image in the Docker Hub, which is Docker’s public registry for distributing container images. Run an Alpine Linux container by issuing the following command:
docker run --rm -ti alpine:latest /bin/sh
The --rm flag passed to the docker run command tells Docker to automatically clean up the container and remove the filesystem as well as the anonymous volumes associated with the container when the container exits. For interactive processes, e.g., those which provide a shell, we have to use the -ti flags to allocate a tty for the container process. The -t flag allocates a pseudo-tty, and the -i flag keeps stdin open for the tty. The /bin/sh specifies which command should be run in the container when it is launched. This launches the sh shell, a lighter shell environment than bash.
A Docker image is intended to encapsulate an application, including all dependencies it requires to run on the Linux kernel. Docker images are constructed in layers, defined in a Dockerfile, and a layer can refer to a base image from which it inherits. Unfortunately, Alpine Linux does not come with a built-in C compiler. Luckily, though, it does come with a package manager, which can be used to install gcc. Let’s create a new Docker image, called alpine-gcc, that will inherit from the Alpine Linux image as a base layer, then a second layer will install gcc. Create a new directory in which we will keep our Docker images specifications and files. Inside that directory, create a subdirectory called alpine-gcc. Inside the subdirectory, create a Dockerfile that contains the following lines:
# Establish a layer that inherits the Alpine Linux image:
FROM alpine:latest
# Installs gcc and the musl-dev C library:
RUN apk add gcc musl-dev
In the alpine-gcc directory, build our image using the following command:
# Replace v0 with any release tag:
docker build -t alpine-gcc:v0 .
Now that we have an image of Alpine Linux with gcc, we are ready to package an application! To see all of the images installed on our system that have the name “alpine-gcc”, issue the following command:
docker image list "alpine-gcc"
There should be only one listing, i.e., the “v0” that we just created.
Container Control with Docker
First, let’s create a basic filesystem event logging program that Docker will encapsulate into a background service.
/* inotify-logger.c */
#include <errno.h>
#include <stdio.h>
#include <stdlib.h>
#include <sys/inotify.h>
#include <unistd.h>
#include <string.h>

static void
handle_events(int fd, int wd, FILE *fp, char *argv[])
{
    char buf[4096] __attribute__ ((aligned(__alignof__(struct inotify_event))));
    const struct inotify_event *event;
    ssize_t len;

    /* Loop while events can be read from 'fd' */
    for (;;) {
        len = read(fd, buf, sizeof(buf));
        if (len == -1 && errno != EAGAIN) {
            perror("read");
            while (1) {}
        }
        if (len <= 0)
            break;
        for (char *ptr = buf; ptr < buf + len; ptr += sizeof(struct inotify_event) + event->len) {
            fprintf(fp, "\nDisplaying info about a new event...\n");
            fflush(fp);
            event = (const struct inotify_event *) ptr;

            if (event->mask & IN_OPEN) {
                fprintf(fp, "IN_OPEN: ");
            }
            if (event->mask & IN_CREATE) {
                fprintf(fp, "IN_CREATE: ");
            }
            if (event->mask & IN_CLOSE_NOWRITE) {
                fprintf(fp, "IN_CLOSE_NOWRITE: ");
            }
            if (event->mask & IN_CLOSE_WRITE) {
                fprintf(fp, "IN_CLOSE_WRITE: ");
            }

            if (wd == event->wd) {
                fprintf(fp, "Watch descriptor: %d\nWatched directory: %s/\n", wd, argv[1]);
                fflush(fp);
            }
            fprintf(fp, "Mask: %d\n", event->mask);
            fprintf(fp, "Cookie: %d\n", event->cookie);
            fprintf(fp, "Name field length: %d\n", event->len);
            if (event->len) {
                fprintf(fp, "Name: %s\n", event->name);
            }
            fflush(fp);
        }
    }
}

int main(int argc, char *argv[])
{
    int i;
    int fd;     /* file descriptor */
    int wd;     /* watch descriptor */
    FILE *fp;   /* file pointer to the log file */
    char buf;

    if (argc != 3) {
        fprintf(stdout, "Usage: %s <watch-directory> <log-directory>\n", argv[0]);
        fflush(stdout);
        while (1) {}
    }

    if ((fp = fopen(argv[2], "a+")) == NULL) {
        perror("fopen");
        while (1) {}
    }

    /* Create the 'fd' for accessing the inotify API */
    fd = inotify_init1(IN_NONBLOCK);
    if (fd == -1) {
        perror("inotify_init1");
        while (1) {}
    }

    wd = inotify_add_watch(fd, argv[1], IN_ALL_EVENTS);
    if (wd == -1) {
        perror("inotify_add_watch");
        while (1) {}
    }

    /* Wait for events and/or terminal input */
    fprintf(fp, "Listening for events...\n");
    fflush(fp);
    while (1) {
        handle_events(fd, wd, fp, argv);
    }

    fprintf(fp, "Listening for events stopped.\n");
    fflush(fp);

    /* Clean-up */
    close(fd);

    exit(EXIT_SUCCESS);
}
The inotify-logger.c program takes two command-line arguments. If it is run with fewer or more arguments, it generates a helpful usage message showing how to run it correctly, then enters an infinite loop. The program initializes an inotify instance, then adds a watch for all events involving the directory passed to it as the first command-line argument. Instead of printing inotify events to standard output, the program prints events to a file specified by the second command-line argument. It attempts to open the file for writing, and prints an error message and enters an infinite loop if this does not succeed.
Now, create a new directory for our image. Inside of this directory, create an empty Dockerfile and an app subdirectory containing a copy of our inotify-logger application. We are going to construct the Dockerfile so that it uses the conventional practice of always inheriting the latest version of an image. To do so, we need to create a tag for the image that serves as an alias to the latest version:
docker tag alpine-gcc:v0 alpine-gcc:latest
Then, open Dockerfile and add the following lines:
# Define a multi-stage image build:
# The first image stage is "builder"
FROM alpine-gcc:latest as builder
COPY app /app
RUN gcc /app/inotify-logger.c -o /inotify-logger

# The second image stage copies the compiled binary
# from the builder image and creates a lighter image
# that just contains the base Alpine Linux and the
# binary. Finally, it launches the binary.
FROM alpine:latest
COPY --from=builder /inotify-logger /inotify-logger
CMD /inotify-logger
To build our new image, issue the following command:
docker build -t inotify-logger:v0 .
We can run it in the background using the -d flag:
docker run -d inotify-logger:v0
Unless we specify a name for our container (which we can do with the docker run --name parameter), Docker will automatically generate a name for our container, consisting of an adjective, then the last name of a famous (and possibly historical) person. To kill the container, issue the following command:
# We can also use the container ID as the target of docker kill
docker kill $CONTAINER_NAME
Our inotify-logger application needs a way to access the directory it is supposed to watch. When we run the container, we can tell Docker to bind-mount the directory we created earlier for our program to watch into the container, by using the -v flag. If the watched directory is /home/$USERNAME/Documents/watch, for example, we can bind-mount this directory into a location at the root of the container. Gievn the following command:
docker run -d -v /home/$USERNAME/Documents/watch:/watch:ro inotify-logger:v0 /inotify-logger /watch /log.txt
our application will monitor a read-only bind-mount (specified by the :ro suffix) and write output to the log.txt file at the root of the container. To view the contents of the log.txt file, we need to enter the container:
# Retrieve the container name or ID with docker ps
docker exec -it $CONTAINER_NAME /bin/sh
From the shell inside the container:
cat log.txt
We can also join the container with the setns() syscall. The nsenter command-line utility provides a wrapper for the setns() syscall. It allows us to execute a command in the namespace(s) of a given process. To retrieve the PID of our container’s “init” process, just use the docker inspect command with {{ .State.Pid }} passed to the --format option. The docker inspect command returns low-level information on Docker objects. By default, the results are rendered as a JSON array. The core functionality of inspect is implemented by the following Go function:
// See https://github.com/docker/cli/blob/master/cli/command/inspect/inspector.go
func Inspect(out io.Writer, references []string, tmplStr string, getRef GetRefFunc) error {
    inspector, err := NewTemplateInspectorFromString(out, tmplStr)
    if err != nil {
        return cli.StatusError{StatusCode: 64, Status: err.Error()}
    }

    var inspectErrs []string
    for _, ref := range references {
        element, raw, err := getRef(ref)
        if err != nil {
            inspectErrs = append(inspectErrs, err.Error())
            continue
        }

        if err := inspector.Inspect(element, raw); err != nil {
            inspectErrs = append(inspectErrs, err.Error())
        }
    }

    if err := inspector.Flush(); err != nil {
        logrus.Errorf("%s\n", err)
    }

    if len(inspectErrs) != 0 {
        return cli.StatusError{
            StatusCode: 1,
            Status:     strings.Join(inspectErrs, "\n"),
        }
    }
    return nil
}
Launch a shell in the container with the following command:
sudo nsenter --target $PID --mount --uts --ipc --net --pid /bin/sh
We can find the cgroup directory of the container by inspecting the /proc/$PID/cgroup file, which lists subdirectories of the /sys/fs/cgroup filesystem. The name string of the container’s cgroup directory should begin with system.slice/docker-.
Since a Docker container’s filesystem is, by default, transient, i.e., when the container is killed, the log file it generated disappears, we might want to create Docker volumes, which is persistent storage that can be shared among containers:
docker volume create logstorage
Launch a Docker container that contains both bind mounts and mounted volumes:
docker run -d -v /home/$USERNAME/Documents/watch:/watch:ro --mount source=logstorage,target=/logstorage inotify-logger:v0 /inotify-logger /watch /log.txt
Configure Networked Containers with Docker Compose
Docker Compose is not a container orchestrator, but it was Docker’s first attempt to create a tool to make it easier to manage applications that are made out of several containers. It consumes a YAML-formatted file, which is almost always named docker-compose.yaml. Compose reads this file and uses the Docker API to create the resources that it declares; Compose also adds labels to all of the resources, so that they can be managed as a group after they are created4.
First, let’s build a simple Docker image named apache-hello. Pull the Apache image onto our Linux machine by issuing the following command:
docker pull httpd
Create a new directory that contains a Dockerfile as well as a subdirectory called public-html. In the subdirectory, create a file called index.html. We can write anything we like into this HTML file, which is the web page that will be served when somebody navigates to our website. I use the following contents:
<html>
<body>
<h1>Hello World!</h1><br>
<h5>© Xingjian Xuanyuan; Washington University, CSE522S, Studio 13.</h5>
</body>
</html>
Edit the Dockerfile to let it define an image that inherits from the Apache httpd image we just pulled, then copies public-html subdirectory to Apache’s default directory:
FROM httpd:latest
COPY ./public-html/ /usr/local/apache2/htdocs/
Now, build the image:
docker build -t apache-hello .
We can run an instance of this image in a container that uses Docker’s default network driver, the bridge driver5:
docker run -dit --rm --name hello-bridge apache-hello
Notice that we are running the container in detached mode (-d) but still providing it with I/O streams and a pseudo-terminal (-it). Docker allows us to inspect its various network drivers to see information about containers using those drivers. Issue the command:
docker network inspect bridge
This prints a large amount of JSON-formatted information about the bridge network to the terminal. Find the section labeled “Containers,” then find the entry for the “hello-bridge” container we just launched. We should see an IPv4 address listed, which, in my case, is 172.17.0.2. We can navigate to this IP address in our web browser.
Install Docker Compose:
sudo apt install docker-compose
Then, create a new directory, and put the following docker-compose.yaml file into it:
version: '2'
services:
  apache:
    image: apache-hello
    networks:
     - webserver
    ports:
     - 80:80
  monitor:
    image: alpine
    command: 'ping apache'
    networks:
     - webserver
    depends_on:
     - apache
networks:
  webserver:
    driver: bridge
This file contains the composition instructions for our application. It defines services, which are the containers it will launch. Each entry in services is equivalent to a docker run command.
- The first container, “
apache,” is our Apache web server. It uses the “apache-hello” image we just built, and establishes port forwarding on port 80. - The second container, “
monitor,” is the monitoring service. This is based on the Alpine Linux base image, and is launched with the commandping apache.
Docker places containers in their own UTS hostname by default; Docker Compose provides each of them with hostname matching the service name, then establishes DNS resolution for the hostname. This allows the monitoring container to ping the web server by its hostname. The “monitor” container also depends on the “apache” container, meaning that the “apache” container is launched first.
The networks section defines a network called “webserver” using the Docker bridge driver. Each entry in networks is equivalent to a docker network create command. Docker Compose allows us to establish an application with multiple bridges, providing the ability to create highly complex networked applications. Here, though, we create a single bridge network, and assign it to both container services.
Verify that the docker-compose.yaml file is well formed, and that Docker Compose is correctly installed, by running the following command from the same directory where we saved the docker-compose.yaml file:
docker-compose config
If that’s successful, build it with:
docker-compose build
Then run it in the background with:
docker-compose up -d
With my Mac laptop and the Linux machine connected to the same Wi-Fi, I found the IPv4 address of the Linux machine’s wlan0 interface, which was: 172.27.4.82. I navigated to this IP address to see my web page. The monitoring container will continue to ping the Apache web server indefinitely. Even though it is not connected to a terminal, its output will be written to its Docker log file. This provides a rudimentary way to monitor the network status of the web server. More advanced applications would typically use fully-featured network monitoring services; nonetheless, this illustrates the idea. We can execute the following command:
docker logs $CONTAINERNAME -f
where $CONTAINERNAME is the name of the monitoring container as listed by the output of docker ps. The -f flag forces the log stream to remain open, and it will continue to output new lines added to the log. This allows us to see, in real-time, the output of the monitoring container.
Footnotes
-
Sean P. Kane and Karl Matthias, Docker: Up & Running, 3rd Edition, O’Reilly Media, Inc., 2023. ⤴
-
For short, an image is a read-only template that creates containers and containers are runtime instances of an image. ⤴
-
The Docker client is a Go program that compiles and runs on all common architectures and operating systems. The command-line tool is available as part of the main Docker distribution on various platforms and also compiles directly from the Go source. The Docker server is nothing but a compute instance (virtual machine, personal computer, etc.) responsible for running the Docker daemon process. The Docker daemon has an application programming interface (API), i.e., Docker Engine API, which is in fact what the Docker command-line tool uses to communicate with the daemon. ⤴
-
See Jordan Webb, “The container orchestrator landscape,” August 23, 2022, https://lwn.net/Articles/905164/. ⤴
-
Docker’s networking subsystem employs drivers, which are pluggable interfaces used to implement the network for Docker containers. The network drivers of Docker include bridge, host, overlay, IPvlan, macvlan, and none. According to the Docker documentation, “a bridge network uses a software bridge which allows containers connected to the same bridge network to communicate, while providing isolation from containers which are not connected to that bridge network.” ⤴
Last updated: 2023-03-30